

It can be really frustrating if it’s too hot outside and your window air conditioner is not cooling.
I have been an HVAC technician for more than 5 years now. And after going through so many clients I know what are the most common reasons why your window ac is not cooling.
So In this article, I’ll guide you on how you can troubleshoot a window ac not cooling. I have given a step-by-step DIY solution so make sure to try them.
STEP 1: Replace Your Window Air Conditioner Filter

This happens to be one of the most frequent reasons for Window AC not cooling i.e. you have a dirty filter. So all of the window air conditioners have a filter in front of them (in the front side of the ac).
Most of the time people forget to clean or replace them and they can cause a lot of trouble to the ac. So you need to make sure that you’re cleaning your filter every now and then.
Follow these steps to clean your window ac filter:
Step 1: First, you have to disconnect all the power from the ac. And you can take it outside to clean. By outside I mean take the whole unit to your backyard or something. Just unplug the unit and take it outside.
Step 2: Now you need to locate where your filter. Most of the window ac will have a filter in the front section. You just need to remove the front grill and you will see your filter there.
Step 3: Now take the filter out and clean it brush or vacuum it. If you haven’t replaced your filter in a while then you need to replace it. Because they have a limited life cycle and they can cause harm to your ac if left dirty and unchanged.
Step 2: Clean Your Dirty Radiator Grill
Once you changed or cleaned your filter. You’ll see a grill behind the filter i.e the radiator grill. So anything that gets by the filter will get stuck on the radiator grill (evaporator coil).
It does get plugged up with time and can cause different problems. The way it works is your unit is sucking air in through the front panel (where your filter is located). And then blowing it out through the top vents.
So during this process dust and debris get accumulated in the front section and can cause cooling problems.
Follow these steps to clean your evaporator coil:
Step 1: First, you need to do is remove the casing of your window air conditioner. The window air conditioner casing is pretty easy to remove. It’ll have clips or screws that’ll be holding the casing. Just unscrew it and remove the casing.
Step 2: After this, you need to put some water and shampoo in a spray bottle. And spray it all over your evaporator grill. Make sure you don’t wet the controller that’s on the top of the ac. If you accidentally spray water or other things on it then just let it dry.
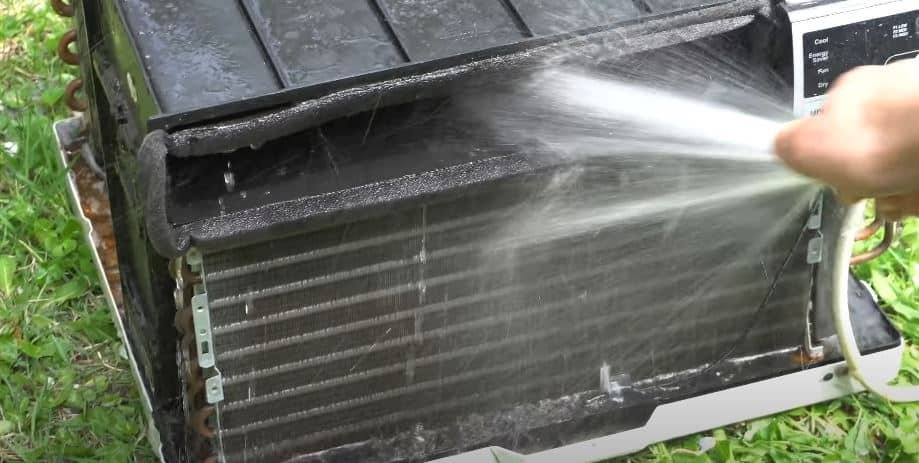
Step 3: Now you need to take a water hose and start spraying water into the evaporator grill.
Now leave it to dry.
Step 3: Your AC is low on Refregirent or leaking refrigerant.
Another big reason why your ac is turning on but not cooling is that your ac is low on freon. Sometimes your window ac will have a leak in the freon supply line and this way you can run out of freon very quickly.
This is not really a DIY repair you must have some qualification for the freon refilling. You can try to find out the leak yourself but it’s better to call a technician.
Step 4: Check Your Capacitor Is Dead Or Weak

Your window ac compressor has a capacitor to start it. The compressor plays a very important role in cooling. Sometimes what happens is your ac capacitor becomes weak. You have to understand this capacitor is not an eternal part.
In fact, they fail very often and they’re also cheap to get. So most of the time when your ac is not cooling you can check your capacitor. Your capacitor might be close to its end cycle.
How to check and replace your capacitor:
Step 1: Disconnect the power supply to the window ac. Remember it can be fatal if you operate while power is flowing.
Step 2: Remove your window ac casing and locate your capacitor.
Step 3: Now you need to discharge the capacitor. Your ac will have a dual-run capacitor that has three terminals Common, HREM, and Fan. Just touch your screwdriver first from common to HERM and then from common to the fan. Now your capacitor is safe to touch.
Step 4: Remove the capacitor and test it on a multimeter. If the readings are too low then your capacitor is probably close to its end cycle. You have to replace it with a new capacitor.
Step 5: Replace the capacitor and check your ac.
Also, Check Our Capacitor Checking and Replacing Guide. Click Here
Even after doing all this DIY stuff your ac is still not cooling then you need to call a technician.